[TOC]
warp在不同python库函数中的实现
做深度水印工作有感,warp的代码还是挺难找的。主要使用的是仿射变换实现,否则不可微。
cv2 不知道,谁拿cv2塞到网络里面呀
1
2
3
4
5
6
7
8
9
10
11
12
13
14
15
16
17
18
19
w,h,_ = img.shape src_points = np.array([[165. , 270. ], [400. , 270. ], [360. , 125. ], [400. , 125. ]], dtype="float32" ) dst_points = np.array([[165. , 270. ], [400. , 270. ], [165. , 30. ], [400. , 30. ]], dtype="float32" ) M = cv2.getPerspectiveTransform(src_points, dst_points) M = np.linalg.inv(M) print (M)out_img = cv2.warpPerspective(img,M,(h,w)) cv2.imshow("img" ,out_img) cv2.waitKey(0 ) cv2.destroyAllWindows()
torchgeometry https://pypi.org/project/torchgeometry/
可微,这是stegastamp-torch复现里面的写法
1 2 3 4 import torchgeometryinput_warped = torchgeometry.warp_perspective(image_input, M[:, 1 , :, :], dsize=(400 , 400 ), flags='bilinear' )
求矩阵方法1:torchgeometry自带的解方程函数,反正输入四对点就行 https://kornia.readthedocs.io/en/v0.1.2/warp_perspective.html
1
2
3
4
5
6
7
8
9
10
11
12
13
14
15
16
17
18
19
20
21
22
def test_geo (): """ 求透视畸变矩阵的方法2,方法1使用cv2的geo函数,载入现有四个点[x,y],和4个目标点[x,y]。获取畸变矩阵。 @return: """ import torch import torchgeometry as tgm import cv2 points_src = torch.FloatTensor([[ [125 , 150 ], [562 , 40 ], [562 , 282 ], [54 , 328 ], ]]) h, w = 64 , 128 points_dst = torch.FloatTensor([[ [0 , 0 ], [w - 1 , 0 ], [w - 1 , h - 1 ], [0 , h - 1 ], ]]) M = tgm.get_perspective_transform(points_src, points_dst) print (M) print (M.shape)
求矩阵方法2 使用opencv获取,也是给四个点就行 1 2 3 4 5 6 7 8 9 10 11 12 13 14 15 16 17 rect = np.array([ [tl_x, tl_y], [tr_x + image_size, tr_y], [br_x + image_size, br_y + image_size], [bl_x, bl_y + image_size]], dtype="float32" ) dst = np.array([ [0 , 0 ], [image_size, 0 ], [image_size, image_size], [0 , image_size]], dtype="float32" ) M = cv2.getPerspectiveTransform(rect, dst) M_inv = np.linalg.inv(M) Ms[i, 0 , :, :] = M_inv Ms[i, 1 , :, :] = M Ms = torch.from_numpy(Ms).float ()
这段表示生成的四个目标点在图像的边缘分布,使用cv2的geo函数解方程获取畸变矩阵 1 2 3 4 5 6 7 8 9 10 11 12 13 14 15 16 17 18 19 20 21 22 23 24 25 26 27 28 29 30 31 32 33 34 35 36 37 38 39 40 41 42 43 44 45 46 47 48 49 50 51 52 53 54 55 56 57 58 59 60 61 62 63 64 65 66 67 68 69 70 71 72 73 74 75 76 77 78 79 80 81 82 83 84 85 86 87 88 89 import cv2import torchimport randomimport torchgeometryimport numpy as npfrom torchvision import transformsdef get_rand_transform_matrix (image_size, d, batch_size ): Ms = np.zeros((batch_size, 2 , 3 , 3 )) for i in range (batch_size): tl_x = random.uniform(-d, d) tl_y = random.uniform(-d, d) bl_x = random.uniform(-d, d) bl_y = random.uniform(-d, d) tr_x = random.uniform(-d, d) tr_y = random.uniform(-d, d) br_x = random.uniform(-d, d) br_y = random.uniform(-d, d) rect = np.array([ [tl_x, tl_y], [tr_x + image_size, tr_y], [br_x + image_size, br_y + image_size], [bl_x, bl_y + image_size]], dtype="float32" ) dst = np.array([ [0 , 0 ], [image_size, 0 ], [image_size, image_size], [0 , image_size]], dtype="float32" ) M = cv2.getPerspectiveTransform(rect, dst) M_inv = np.linalg.inv(M) Ms[i, 0 , :, :] = M_inv Ms[i, 1 , :, :] = M Ms = torch.from_numpy(Ms).float () return Ms def warp_genel (image_input,global_step ): width = 256 rnd_trans= 0.1 rnd_trans_ramp= 1000 rnd_tran = min (rnd_trans * global_step / rnd_trans_ramp, rnd_trans) rnd_tran = np.random.uniform() * rnd_tran Ms = get_rand_transform_matrix(width, np.floor(width * rnd_tran), batch_size=1 ).cuda() input_warped = torchgeometry.warp_perspective(image_input, Ms[:, 1 , :, :], dsize=(256 , 256 ), flags='bilinear' ) return input_warped if __name__ == '__main__' : img_path = r'./data/DIV2K_train_HR/0801.png' img = cv2.imread(img_path,0 ) img = img[40 :256 ,0 :256 ] img_torch = transforms.ToTensor()(img) img_torch = img_torch.unsqueeze(0 ).cuda() for epoch in range (100 ): img = warp_genel(img_torch,epoch*5 ) img = img.squeeze(0 ) img = img.cpu().numpy().transpose(1 , 2 , 0 ) cv2.imshow("1" ,img) print (epoch*10 ) cv2.waitKey(30 )
使用代码是这样的,原理应该是通过随机图像的周围4个点,求出仿射矩阵Ms,再计算扭曲的图像。
代码里面是针对256,256方形图像,因为(d,d),;不是方形的图像大概要改成(d,w),让点描在边缘,求出此次的仿射矩阵。
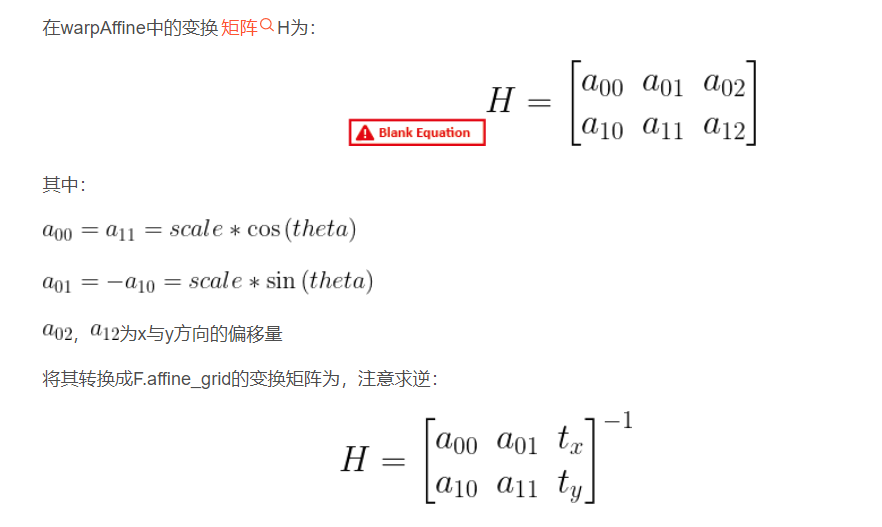
pytorch https://pytorch.org/docs/stable/generated/torch.nn.functional.affine_grid.html
详细:https://blog.csdn.net/Eddy_Wu23/article/details/108797023?spm=1001.2101.3001.6650.2&utm_medium=distribute.pc_relevant.none-task-blog-2%7Edefault%7ECTRLIST%7ERate-2-108797023-blog-83244785.pc_relevant_multi_platform_featuressortv2dupreplace&depth_1-utm_source=distribute.pc_relevant.none-task-blog-2%7Edefault%7ECTRLIST%7ERate-2-108797023-blog-83244785.pc_relevant_multi_platform_featuressortv2dupreplace&utm_relevant_index=4
F.affine_grid表示仿射变化,只能表示仿射变换,不能表示扭曲变化,对于二维theta是2 X 3 的矩阵,对于三维是3 X 4 的矩阵。
仿射变换只有x,y轴的变换,没有Z轴的变换。
最右侧一列可以平移,其他的位置最好不要动,在三维中,三个通道是可以分离的,会导致三个通道分离,Z轴变换。
1 2 3 4 5 6 7 8 theta = torch.tensor([ [3 , t1, 0 , 0 ], [t2, 2 , 0 , 0 ], [0 , 0 , 1 , 0 ] ], dtype=torch.float ) grid = F.affine_grid(theta.unsqueeze(0 ), img_torch.unsqueeze(0 ).size()).cuda() output = F.grid_sample(img_torch.unsqueeze(0 ), grid) new_img_torch = output[0 ]
一直有个疑问,为什么这个仿射变换和仿射变换公式不一样;看到上述URL2,发现此处的torch仿射变换F.affine_grid,是对theta仿射矩阵进行了求逆矩阵操作的。theta = [θ]^-1.
theta为三级矩阵,显然可微,因为就是一个矩阵乘法
图像变换矩阵,前3列,第4列为4维张量新加入部分。若为3通道图像,则不需要加入第4列。
保证
当前3列不为对角矩阵时,为图像扭曲函数,此为一般情况。
其中,(1,2)(2,1)位置应当偏小一些,由(1,1)(2,2)位置控制缩放大小。
一般而言,(1,2)(2,1)控制微调,(1,1)(2,2)控制大小。
torchvision 不可微,而且还是带有随机参数的,毕竟本来就是randomaffine,是拿来做数据扩展的
1 2 import torchvision.transforms as transformtransform.RandomAffine(degrees=0 , translate=(0 , 0 ), shear=[20 ,90 ])(img0)
tensorflow stegastamp -tensorflow 使用的方法
1 2 3 4 5 6 7 8 9 10 11 12 13 14 15 16 17 18 19 20 img=cv2.imread('/home/xp1/Pictures/004545.jpg' ) input =tf.placeholder(dtype=np.uint8,shape=[375 ,500 ,3 ]) src_points = np.array([[165. , 270. ], [400. , 270. ], [360. , 125. ], [400. , 125. ]], dtype="float32" ) dst_points = np.array([[165. , 270. ], [400. , 270. ], [165. , 30. ], [400. , 30. ]], dtype="float32" ) M = cv2.getPerspectiveTransform(src_points, dst_points) T = M.reshape(1 ,-1 ).squeeze().tolist() T = T[:-1 ] trans_op=tf.contrib.image.transform(input , T) with tf.Session() as sess: trans_img=sess.run(trans_op,feed_dict={input :img}) cv2.imshow('img' ,trans_img) cv2.waitKey() cv2.destroyAllWindows()
kornia 这个据说是一个高阶的API,可以可微得进行数据扩展,warp是其中之一,没有试过
1 from kornia.geometry import get_perspective_transform, warp_perspective
参考文献 仿射变换博客:https://www.jianshu.com/p/723af68beb2e
STN博客:https://blog.csdn.net/qq_39422642/article/details/78870629
STN网络教程:https://pytorch.org/tutorials/intermediate/spatial_transformer_tutorial.html

 ,其中,A为2阶矩阵,B为1阶矩阵。